Sunday, January 30, 2011

Bologna Cake, a fun appetizer

I saw this on Foodgawker last week, made a mental note that it would be fun to make and bring to a potluck, when luck would have it, I got an invite to dinner last night, so I made it.   This has to be one of the most fun dishes I've ever made.


As I was carrying it in, I got comments on the 'cute' little cake I had in my hand, and when I said what it was, there was stunned disbelief.    But it tickled everyone's funny bone, and the next thing I knew people were cutting into and eating it, and laughing at the whimsical 'cake'.    I had so much fun with the comments and the fun people had eating it.    Following are the pictures I took of it, but first here's the link to the original post.

Bologna Cake

Cast of Characters

First couple of layers


Using my offset spatula (Christmas present used for first time)

Ready to go to the party

Sliced and ready to be eaten
I'll say it again, this has to be one of the most fun appetizers I've ever made, to make and to eat.

Bologna Cake

Oscar Mayer Bologna, 12 oz package
1 1/2 8 oz. packages of cream cheese
1/2 package of dry Ranch dressing
1 8oz can Aerosol Cheese, Sharp Cheddar
Cilantro Leaves for decorating.
Buttery Crackers for putting it on.   (All I had on hand was Flipsides Pretzel Crackers, they worked)

I used the whole package of ranch dressing to 2 packages of cream cheese (what you don't use on the cake is great on crackers the next day.)
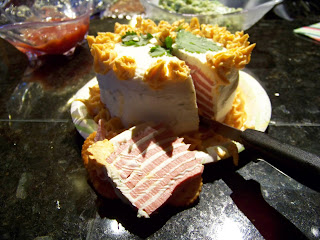
Just spread the cream cheese, about a tablespoon or so, on each layer of bologna and continue till you've used up the whole package. I think it is important here to have the bologna in as uniform slices as possible, it makes for a very nice presentation.    Then 'frost' the cake with more of the cream cheese and decorate with the aerosol cheese, (it comes with a handy star tip).    I had some cilantro from a recipe for Chile Arbol Hot Sauce (recipe will be posted soon), and so I used some of that to finish off the cake. 

A guest at the party suggested using some pesto as part of the decorations, another thought some green chopped olives would complement it.   I think this is just one of those things you can have fun with.     And thanks again to Las Vegas Food Adventures for posting this.


For more recipes please check out   http://sidsseapalmcooking.blogspot.com/   

All about food. *giggle*


Saturday, January 29, 2011

Oh what a beautiful day!

The sun is shining, the skies are blue, there's a faint, very, very faint hint that spring is coming, just a great day to be alive. 

Up the beach...

down the beach

Gulls resting on sandbar

Taking off

Flying along.
 I just wanted to share a little of the beauty that surrounds me every day.    And the pictures from my walk yesterday.   Today looks to be more of the same, so guess where I'll be.   Have a great day.

Thursday, January 27, 2011

Southwestern Casserole

I love potlucks, covered dish socials, or generally any kind of get together where people bring food.    Mostly, because those kinds of functions mean people are generally in a good mood, and the food choices that people bring is always an adventure.   In our area we are limited in our choices of restaurants, but that doesn't mean we can't have good food.    We have monthly potlucks and there are some totally awesome cooks who bring a large variety of dishes, which makes for some really good eating.    A couple of months ago I made a Southwest Casserole for a potluck, and had people begging me for the recipe.   It's one I got from my sister and in fact is one that both of my older sisters make on a regular basis.   It's easy to put together, it freezes well, and most people like it.    I had to laugh a couple of years ago, when I was visiting with them, my oldest sister had everyone over for dinner and pulled one of these out of the freezer and my other sister brought one as well, that she'd made and that was in her freezer.   Between the two casseroles, there was more than enough food for all of us.   It was one of those great minds think alike moments.  (Did I mention I'm a big fan of my sisters? All of them are great cooks.)


All the ingredients.


Meat browned with onions, and spinach and tomatoes added in.
Salsa and Tomato Sauce added to mixture.
The meat mixture layered in pan with cheese and tortillas just like a lasagna.

Final layer with tortillas on top of second layer of meat. 

Ready to go into the oven. 

And as usual I forgot to take a picture after it came out of the oven, as we were on our way to a potluck and I was trying to time it so that the casserole would come out just before we had to leave.    Just picture it nice and golden on top, and the next time I make it, I promise to take a picture and post it. 


Gitte’s Southwestern Casserole

1 ½ lbs ground beef
1 small onion, chopped
1 garlic clove, crushed and minced
1 ½ cups salsa   (use your favorite brand, or make your own)
8 oz can tomato sauce (you can also use El Pato Mexican Tomato sauce here, it adds a little heat).
1 tbsp. lime juice
2 med. Tomatoes, diced
1 ½ tsp. salt  (optional, I rarely use salt when cooking and in fact there is enough salt in the salsa to make up for omitting it.)
1 large red pepper, chopped
1 cup sour cream
¾ c cheddar, shredded
¾ c Monterey jack, shredded (I use grated colbyjack cheese, it works well here)
½ cup sliced black olives
10 oz. frozen spinach, thawed and drained
12 corn tortillas (Gitte uses flour tortillas, as do I)
(I also add a couple of minced jalapeno's for some extra heat)

Brown meat and onion. Add salsa, spinach, tomato sauce, tomatoes, pepper and lime juice. Simmer for a few minutes.

Line a 13x9x2 inch casserole dish with the some of the tortillas, place half the meat mixture on tortillas, layer remainder of tortillas then the other half of the meat mixture. Bake in 350 deg. Oven for 30 minutes, add the cheese and bake another 30 minutes. Remove from oven and let stand for 10 minutes before cutting and serving. This is also when I put a stripe of sour cream down the middle and add some olives and green onions to it for decoration.


For more recipes please check out   http://sidsseapalmcooking.blogspot.com/   

All about food. *giggle*

Hint: For ease in serving later, cut the tortilla’s in squares before layering with meat mixture. This enables you to cut and serve neat little squares. Especially good at potlucks. 
This also freezes like a dream, just take out and pop it into the oven when needed. My
sisters usually have one or two in their freezers for emergency meals.


Monday, January 24, 2011

Chicken Enchilada's

 What do you get with the following ingredients?     I should rephrase this, I had a half a chicken breast in the freezer, some tortillas, enchilada sauce and cheese.   So I did what any self respecting person in need of a mexican food fix would do.    I put them all together and added a can of chopped green chiles, some cumin and ended up with Chicken Enchilada's.
The cast of characters

All in the bowl.

The first bowl wasn't big enough, so here's the mixture.

Filling laid on the tortilla before being rolled up.

All ready for the oven.

The finishing touch, a scatter of cheese.

 Recipe (approximate proportions) 

Cooked chicken, shredded
Can green chiles
Grated Cheese, Monterey Jack, Cheddar or combination, 8 oz or so.
Cumin, 1/2 tsp. or to taste.
Enchilada Sauce
Flour tortillas.

Shred chicken and add a little of the enchilada sauce to moisten, then add a can of chiles, some cumin and stir together.   Pour a little of the enchilada sauce into a shallow baking dish, set aside.  Place some of the mixture across a flour tortilla and roll up, placing it seam side down in the baking dish.   Pour the remaining enchilada sauce over the enchiladas, cover and bake for about half an hour at 350 deg.   Take cover off and throw some grated cheese on top, put back in oven for a few minutes to melt the cheese.  Take it out and serve with a nice cold beer or big old glass of milk.     I had a half a chicken breast and it made 5 good size enchilada's, and was more than enough for dinner with some left over for lunch.  


For more recipes please check out   http://sidsseapalmcooking.blogspot.com/   

All about food. *giggle*


Sunday, January 23, 2011

Navajo Tacos


Years ago I started cooking up meals that were easy to double, and froze the leftovers for another day.   I only cook for two people now, but I try to make my time in the kitchen count.   If I'm browning a pound of hamburger, I brown two pounds, divide it in half and freeze the remainder.    It doesn't take any more time, a minimal amount more energy, and if you have to clean up anyway, why not make it count, and only clean once.  There are so many dishes that start with a pound of browned hamburger or turkey.   Or if I'm making meatballs, I make extra, and either cook them then, and freeze them or just freeze the shaped meat.

When I make Chile, Chile Verde, Spaghetti Sauce or soup I always make enough for several meals.    Having a selection of easy to heat foods in the freezer for those days when life goes wrong, means I don't have to stress about getting a good meal on the table, or try to figure out which restaurant to go to.

And when you've got Chile in the freezer, you've got the beginnings to several meals.    Including Navajo Taco's.

The first step is to make Chile, using your favorite recipe or the following Chile recipe which is one I got from my mother in law, (she likes to make a big pot of Chile and invite her boys over for Chile and Scones, fry bread).    I've tried a lot of Chile recipes over the years, but this one, is my go-to recipe.

Carol told me that the recipe was developed by a fireman and he won a cook off with it, I don't know his name but did want to point that out.     But I said I was going to make Navajo Taco's, so here's the step by step.   (Well, almost the step by step, I forgot to take pictures of the dough, and the chili as it was cooking. ).
And I use frozen bread dough for this, trust me, it's easy and quick.   Thaw the bread dough and then slice it into roughly 8 pieces.   Place the pieces on a piece of parchment paper, aluminum foil, or wax paper so that the slices don't touch.   Let them sit for a few minutes while you heat up a pan of oil.   Just use a big old saucepan and place a half inch or so of oil in the pan.    While it's heating, take the first piece of dough and pat it out, using your fingers to make it a larger, round piece.   You can use a rolling pin for this, but I prefer the look of the fry bread when it's been patted out.   Place the bread dough into the hot oil, and cook until brown, turning it once.   When it's cooked, take it out of the oil and place on paper towel to drain for a few seconds.  Then place it on the plate and let the fun begin.   
Place a freshly fried piece of Fry Bread on a plate.
Add some of the Firehouse Chile or your own favorite Chile, on top.

Some Lettuce,
Chopped tomatoes,
And last but not least, a sprinkle of cheese.    And at this point you can also add some sour cream, guacamole, chopped onions, chopped black olives, salsa or hot sauce, your choice.   But try it this way the first time you have it.  
Oh,  and the leftover fry bread you just cooked, just spread some butter and honey on top and eat.   And call it the dessert.   

As I write this, I've got some Spaghetti sauce heating on the stove, some of which I made the other day, and I decided to go ahead and brown up some ground turkey for tacos later on in the week.   I add the taco sauce to the meat, and then just freeze it in meal size portions.   That way, when my DH wants taco's, all I have to do is pull out the cooked taco meat, heat it and make taco's.   (did I mention that while I like to cook, I don't believe in doing more than I have to).  

Here's the recipe for the Chile.   


Firehouse Chili

1 ½ -2 lbs. Ground beef or pork

1 lg. Onion Chopped (Carol used minced onion flakes)

1 bell pepper chopped

3-4 cloves garlic (Carol used garlic powder)

1 can Kidney Beans

1 can Chili Beans

1 can Pinto Beans

1 can Ranch style beans

14.5 oz. Can Rotelle Chiles and Tomatoes

1 large can enchilada Sauce

New Mexico Chili Powder to taste

Louisiana style Crystal Hot Sauce to taste

Carol used the Chili Beans for the seasoning and didn’t use the other chili powder or the hot sauce.

Brown the meat and place in crock pot, add all other ingredients and allow to simmer overnight or for at least 8-10 hours.

I also add a couple of jalapeno's for heat and flavor. 


For more recipes please check out   Sid's Sea Palm Cooking

All about food. *giggle*


Friday, January 21, 2011

Home Made Dog Food

I read labels, all kinds of labels, on the foods I eat and labels on the food that I feed my dogs.     Go ahead and read the labels on your dog food, I'll wait.    

Well, could you pronounce half the stuff they put in there?  I can't, and I'm really pretty good at this reading stuff.     Which brings me to what I do.    I make the majority of the food my dogs eat.   I've been making their food for many years.   And the end result is, I have happy, healthy dogs.   Their skin is good, their fur is nice, they have energy and very little ill health.    I used to just cook up some indeterminate meat, add some veggies and call it a day, but over the years I've refined the recipe and now I make up the same basic meatloaf each time. 

 Around here we call it Mauli Loaf in honor of our dog Mauli.     She is the reason I learned a little more and refined the Mauli Loaf recipe.
Mauli (gray poodle) and Chimi (white poodle) chasing Moose.

When we first got Mauli she was a three year old, former breeder and you could tell she needed something extra.    She'd just finished weaning her latest and last litter and it showed.   So, I started off feeding her canned food along with some dry foods.    That was ok, but the stuff in the cans stunk and made her stink as well.   (go ahead, give your dogs a good sniff, do they smell a little funky? Yup, it's the food.)    So I started making her some food, and through trial and error, came up with a basic formula.   Mauli was more than happy to eat all the different versions, some a little more happily than others, but for the most part she gulped them on down.   She thought she was eating people food, giggle.    I started off with equal amounts of ground beef, and vegetables, added brown rice and oatmeal along with some eggs, mixed it all together and baked it.   Oh and I almost forgot, 1 good tablespoon of garlic powder was mixed in as well.   I used to bake it, and then weigh out exactly 11 oz. per meal and she would eat it.   Then we got a second dog and  I was making meatloaf a couple times a week.    Our new dog is also a rescue and she loves to eat Mauli Loaf as well.   Then a couple of years ago I started using chicken in place of the ground beef and Mauli likes it even better, umm, did I mention that chicken is her favorite animal protein?    Have you checked out the price of ground beef?  Yikes, and you can get chicken leg quarters for as low as 49 cents a pound on sale.    Need I say more?
Chicken leg quarters cooking up.

Brown rice

Peas and Carrots and Eggs

Rice with veggies and eggs.

Chicken taken off the bones and added to the rest.
Oatmeal, last but not least.

All mixed up and ready for the oven.
Mauli Loaf in the oven


At any rate, for the past couple of years I cook up chicken and then add it to the frozen veggies, brown rice, oatmeal and eggs and bake that into a meat loaf style food.     I try to cook as much as I can ahead, but still end up making them food at least once a week.     I love watching the dogs play for hours, especially when one of them is over 13 yrs old and the other is 4 yrs old.   Mauli does have some older dog issues, mainly weak eyesight and her hindquarters are also weak, but her zest for living, and playing with her ball for hours, well, let me put it like this, I'll continue to make the effort of home made food for them.  My girls also like it when I just put the mixture into a frying pan and cook it that way.   Maybe because when I do it that way, I add some fat to the pan, and it cooks it up nice and brown.
Mauli Loaf frying in the pan.


Mauli Loaf Recipe


2 lbs, chicken, cooked and taken off the bone ( I either cook them in the crock pot or on top of the stove til the meat is ready to fall off of the bone)
2 lbs. Frozen Vegetables  ( I prefer Peas and Carrots, they seem to be more digestible)
4 cups cooked brown rice  (you can use instant brown rice as well)
4 cups oatmeal, (The regular oatmeal works best)
3-4 eggs.
Water or the chicken stock you cooked the chicken in.  (side benefit here, you can also use the chicken stock for yourself, just salt it later on). Skim the majority of the chicken fat off the top, some fat is good, but it can really do a number on my older dog's digestive system.    However, if you are in a cold climate, fat is good.  It burns off as energy for the dogs.   

Mix all together and place in a pan and bake in the oven for  90 minutes or until the temp reaches 180 deg.
Cut into chunks and serve them to your dog.    Refrigerate it for serving over the next couple of days.    I have to admit to warming it at this point, either by zapping it in the microwave or in a fry pan.  Mauli appreciates warm food nowadays.  

Mauli and Chimi having a well deserved nap.


For more recipes please check out   http://sidsseapalmcooking.blogspot.com/   

All about food. *giggle*


Wednesday, January 5, 2011

Happy New Year, Belated

Celebrated New Years Eve with friends, at least til about 9:30 when I headed home to bed, where I stayed for the first part of the new year.    And I'm still recovering from the flu.     But, it struck me somewhere in the throes of a high fever and no appetite, that now is the perfect time to start my New Years Resolutions.  Hey, if I don't have an appetite, and the thought of a traditional (for me at least), New Years meal of Ham, Grønlangkål og Brunede Kartofler is more than I can handle, then this is the perfect time to start downsizing myself.  Which is the only acceptable downsizing I'm going to allow this year.  

I'm also going to be making Citronfromage next week for the Boat Club using the Meyer's Lemons I grew, so stay tuned for that and in the meantime, 
Take a look at what's happening outside right now, (sorry the pictures not that good), but look at the lower right corner, it really was raining that hard.  
Of course this morning it was threatening to do so, take a look;
Just after sunrise.  

Hope you all had a great New Years Eve, and I'll be updating here soon.